Home automation with Raspberry Pi - Part 1
This series dives into home automation with Raspberry Pi for DIY enthusiasts and electronics hobbyists. It is subdivided into 5 parts:
- Introduction to the Raspberry Pi
- Controlling Raspberry Pi GPIO
- Sensors: temperature and humidity, passive infrared, ultrasonic
- Automating lights
- Controlling Tapo cameras
- Building and integrating an AI voice assistant
- Personalized web control interface with Flask
- Building personalized PCB boards
Introduction to the Raspberry Pi
- Raspberry Pi is a series of small single-board credit card-sized computers developed by the Raspberry Pi Foundation. Raspberry Pi boards run on Linux OS, and have many interesting applications comprising simple learning projects to complex industrial automation and robotics, and is a common platform for electronics hobbyists and engineers. In this series, we will build a home automation platform based on Raspberry Pi.
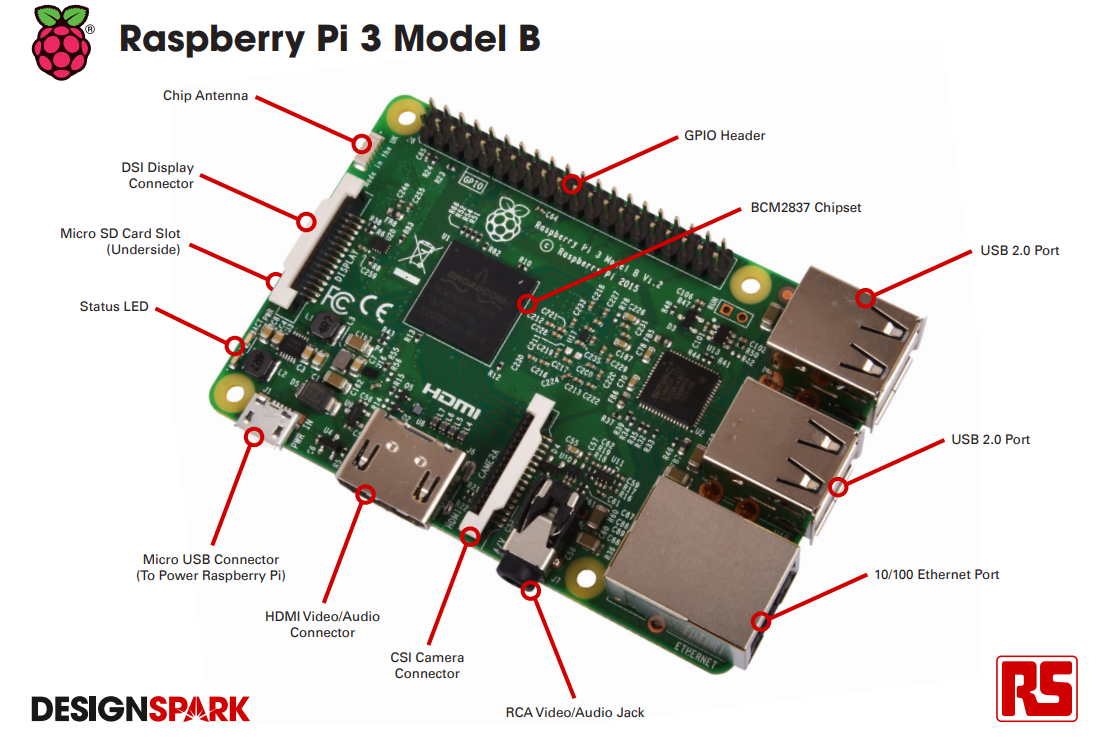
- Raspberry Pi components: A Raspberry Pi board features a CPU, RAM, USB ports, WiFi and Bluetooth (depending on the model), as well as on-chip SPI, I2C, I2S, and UART peripherals, which are used to integrate different sensors and modules. Raspberry Pis come in different models: model 3B, 4B, etc. In this series, we use the Raspberry Pi 3B. Nevertheless, things should work (with minor changes) on a more recent models like model 4B. The following image highlights some of the hardware components that comprise a Raspberry Pi 3B board.
Setting up the Raspberry Pi
- All the development in this series is done principally on a Linux based OS, i.e., Ubuntu. However, tips will be given for Windows based users. In this series, the words “Raspberry Pi” and “Pi” will be used interchangeably to describe a single Raspberry Pi based board. We recommend installing Visual Studio Code as the main IDE.
- The first step involves flashing a Raspberry Pi operating system (OS) image. Tools like BalenaEtcher and Raspberry Pi Imager are popular for this purpose. We use the latter in this series. Download a compatible Raspberry Pi OS image for your board here: Raspberry Pi OS Downloads. Pi imager also provides the possibility to download and flash a Pi OS directly. The
liteversions do not come with an embedded GUI and have less software included (500MBvs2.7GB). We will use the lite versionRaspberry Pi OS Lite(July 4th 2024 in my case), and connect to our Pi over the network via SSH (since no lite versions have no GUI by default). - Download Pi imager:
sudo snap install rpi-imager. For windows, download here: Pi imager - Launch Pi imager and follow the instructions to setup your Pi’s: SSH username (e.g.,
pi), network hostname (e.g.,pi-homeauto), password (use a strong but easy to remember password), and WiFi credentials. When asked if youwould like to apply OS customization settings, chooseedit settings. Otherwise, useCtrl + Shift + Xto open the SSH and Wifi configuration prompt in Pi imager. - Flash the Pi OS on the SD card. After flashing, nmount and remove the microSD card from your PC, insert it into your Pi board and power up the board insert SD card into your PI and power up it up. Raspberry Pi OS will use the above configurations at boot time to automatically configure WiFi and SSH access to your Pi. A green LED flashing means the Pi has completed booting and is ready to be accessed over SSH.
Getting your Pi IP address
- There are multiple ways to obtain your Pi’s IP address: using tools like
nmaporarp-scan. We usenmap. Start by installingnmapandnet-tools, and then runifconfig | grep netmaskin the terminal to obtain your subnet mask IP.1 2
sudo apt install nmap net-tools ifconfig | grep netmask
- Example ifconfig results:
inet 192.168.1.42 netmask 255.255.255.0means the subnet mask IP is 192.168.1.0 and subnet mask /24. That is the first 24 bits (8x3) are masked. For netmask 255.255.0.0, the subnet mask will be /16. Run nmap with your subnet mask to scan your subnet and obtain your Pi’s IP address.1
sudo nmap -sP 192.168.1.0/24
- The results of an nmap scan on my local network are shown below.
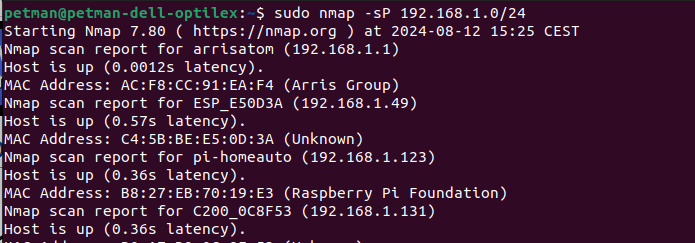
The scan reveals my Raspberry Pi’s IP address is 192.168.1.123. Note this address down as it will be used to connect via SSH.
The above image also reveals the MAC addresses of different devices on my home network. A MAC address uniquely identifies devices on a local network. While it’s generally not risky to publicize your MAC address, I’d recommend you keep yours private if you are very cautious about security.
Connecting to your Pi
Run the command ssh pi@pi-IP-address or ssh pi@pi-homeauto. For example:
1
ssh pi@192.168.1.123
Are you sure you want to continue connecting (yes/no)?: enter yes. pi@130.125.11.172's password. Enter the password configured during the setup. The default Pi password is raspberry. You should now have a remote connection to your Pi.
- Update your source lists and install useful packages
1
sudo apt update && sudo apt install git python3-pip -y
Remote development with VS Code
- I’m a fan of VS Code and use it as my main IDE. You can configure VS Code to access folders and files remotely on your Pi. By doing this you can easily write scripts and test on your Pi board remotely.
- To connect to your Pi via VS Code, type
Ctrl + Shift + P, chooseRemote-SSH: Connect Current Window to Host ..., and typessh pi@192.168.1.123and your password to connect to your Pi. - For a more complete tutorial on remote development with SSH on VS Code, see this tutorial.
- If you are more “geeky”, you can use tools like
EmacsorVimto create and edit files directly via the terminal. - In part 2 of this series, we will write simple Python programs to control GPIO pins.