Arm TrustZone and OP-TEE for dummies
This is part of the TEEs for dummies series. Arm TrustZone is the main process-level TEE on Arm, and OP-TEE is the practical framework we will use to test it.
Arm TrustZone (TZ) is a hardware security extension in ARM-based processors that splits the processor into two protection domains: a secure world, where data is processed securely and isolated from the host OS (or hypervisor), and a normal world which has no access to secure-world resources. At any point in time, the processor operates exclusively in one of these worlds. A privileged software component called a secure monitor enables context switching between both worlds using secure monitor calls (SMC), analogous to SGX ecalls and ocalls.
A hardware component called the TrustZone address space controller (TZASC) enforces the separation between the secure world and the normal world by controlling access to physical memory. TZASC can be programmed so that some parts of physical memory (contiguous blocks) are only accessible in the secure world, or in both worlds. A special bit called the non-secure (NS) bit, stored in the secure configuration register (SCR), is used to determine which world the processor is currently operating in.
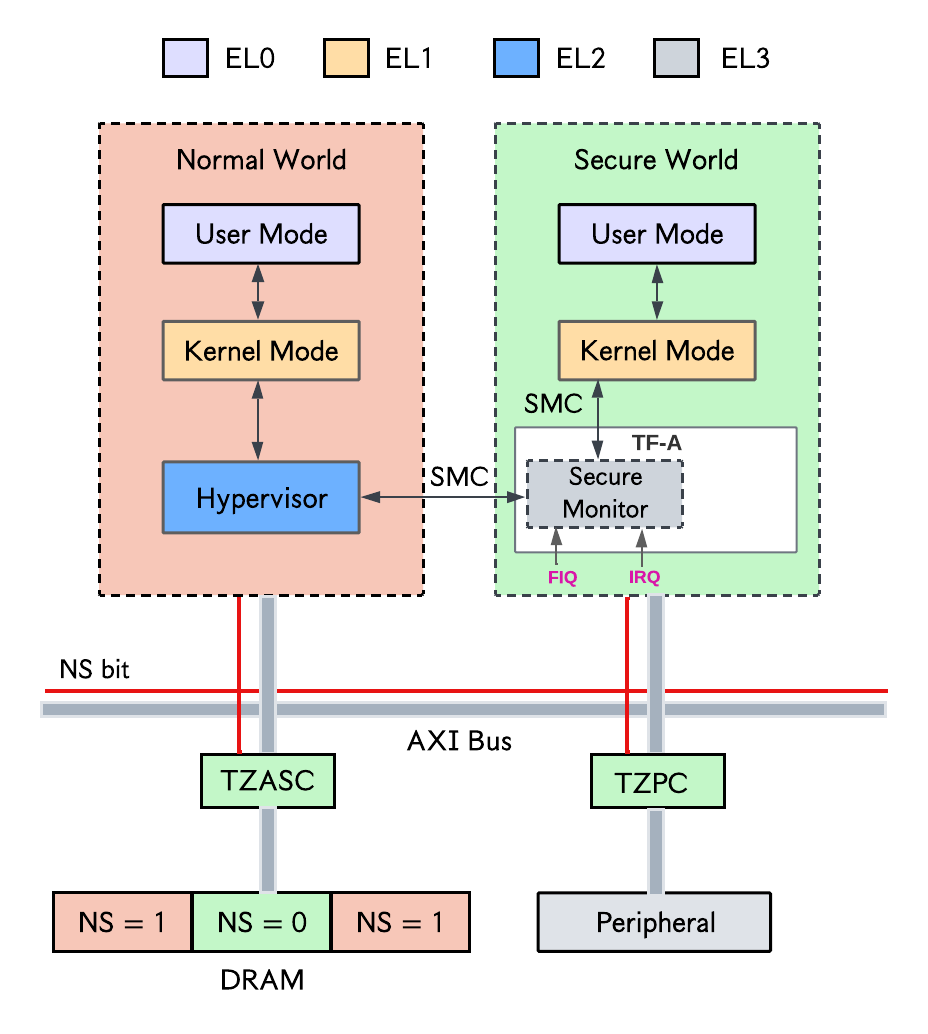
A similar hardware component called the TrustZone protection controller (TZPC) arbitrates access to peripherals. TZPC can be configured so that a peripheral is accessible only from the secure world, or from both worlds.
Contrary to TEE technologies like SGX which encrypt data stored in memory, TrustZone only performs access-control checks to ensure confidentiality.
Hardware and software setup
From my experience with Arm TrustZone, it is often trickier to get the right hardware with decent software support when compared to server-side TEEs like SGX. I believe this is partly due to the fragmented nature of the Arm ecosystem: Arm licenses IP to many SoC vendors (STMicro, NXP, HiSilicon, Broadcom, and others). For beginners, I recommend boards by STMicroelectronics. They are relatively cheap and provide excellent documentation. STM provides both Cortex-M processors for low-power microcontroller applications and Cortex-A processors for running full-fledged OSes like Linux.
For this guide, we use the STM32MP157D-DK1, which features a Cortex-A7 core, TrustZone support, and good documentation.
OP-TEE (Open Trusted Execution Environment)
Even with a board that supports TrustZone, you still need the right software tools to build programs that can leverage TrustZone’s security features. This is where OP-TEE comes in. It is an open-source framework for building applications secured with TrustZone.1
A simple analogy: OP-TEE is to TrustZone what the Intel SGX SDK is to SGX. Similar to SGX, a TrustZone-based application running in OP-TEE has two parts: a client application (CA) which is the untrusted part executing in the normal world, and a trusted application (TA) which is the trusted part executing in the secure world.
The official OP-TEE documentation defines it as “a Trusted Execution Environment (TEE) designed as companion to a non-secure Linux kernel running on Arm Cortex-A cores using the TrustZone technology”. Personally, I think this definition can confuse a beginner who already considers TrustZone to be the TEE. I refer to OP-TEE as a framework for building TZ applications.
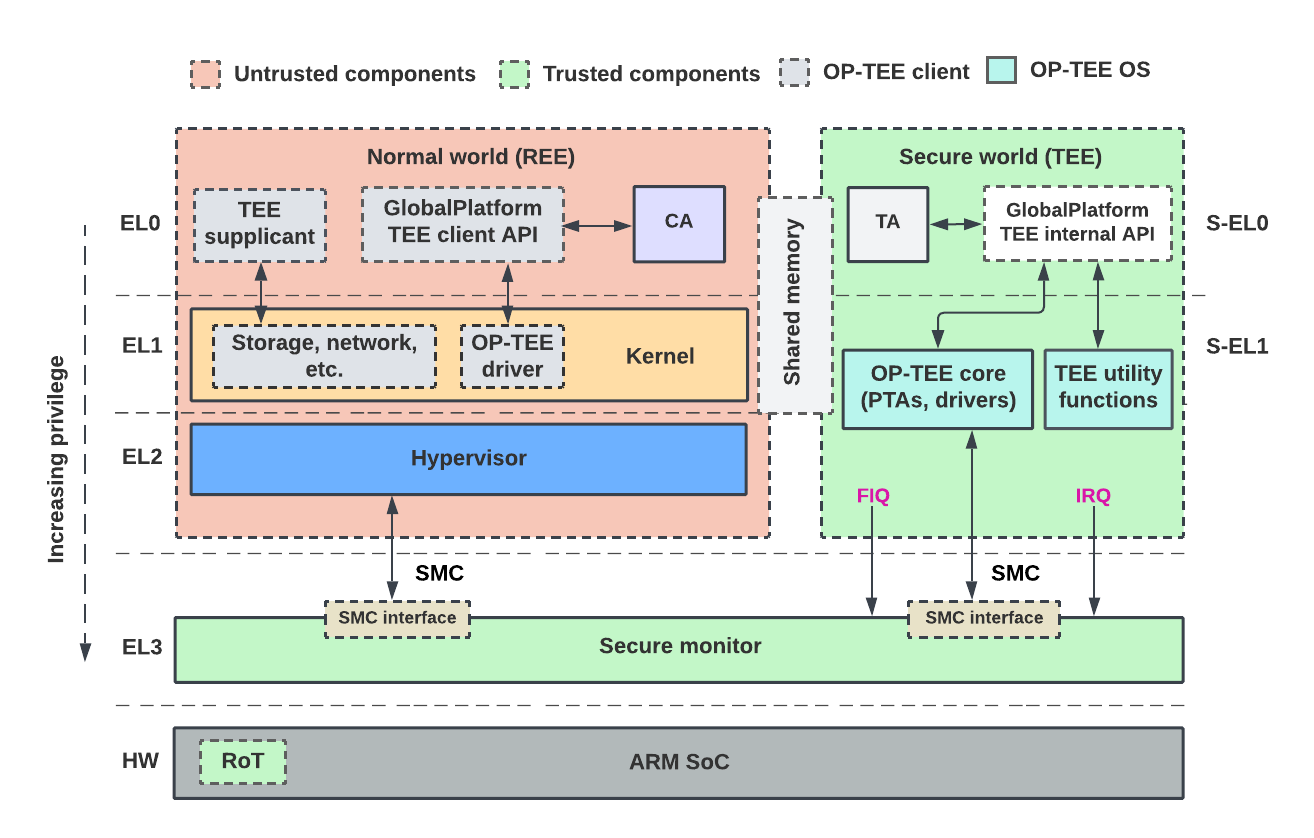
As shown below, OP-TEE comprises two main components: optee-os on the trusted side (secure world) and optee_client on the untrusted side (normal world). The secure monitor bridges both components.
optee-os: a TEE OS executing at ARMv8 secure EL1. It provides generic OS-level functions such as interrupt handling, thread handling, crypto services, and shared memory. It implements the GlobalPlatform TEE Internal Core API, used to implement TAs that run in the secure world at ARMv8 secure EL0.optee-client: a normal-world user-space library and a normal-world user-space daemon. The library,libteec.so, implements the GlobalPlatform TEE Client API, through which normal-world CAs interact with TAs. The daemon, TEE-supplicant, provides auxiliary functionality for the trusted OS, such as loading TAs from the normal-world file system into the secure world.
Chain of trust
In Arm TrustZone and OP-TEE, a chain of trust ensures that each stage of boot is authenticated. It starts from the BootROM, which is the root of trust (RoT). This RoT authenticates the first-stage bootloader, which in turn authenticates the second-stage bootloader, and so on. Processes like secure boot define and implement this chain of trust.
Building OP-TEE for the STM32MP157D-DK1
The following is based on the official OP-TEE STM32MP1 guide. We will build OP-TEE for the STM32MP157D-DK1 and flash it on the board. These steps are done on your work/host PC, not on the board.
- Install prerequisites (Ubuntu 22.04):
1
2
3
4
5
6
7
8
9
10
11
12
13
export DEBIAN_FRONTEND=noninteractive
export FORCE_UNSAFE_CONFIGURE=1
sudo apt-get update && sudo apt-get upgrade -y
sudo apt-get install -y \
    adb acpica-tools autoconf automake bc bison build-essential ccache \
    cpio cscope curl device-tree-compiler e2tools expect fastboot flex \
    ftp-upload gdisk git libgnutls28-dev libattr1-dev libcap-ng-dev \
    libfdt-dev libftdi-dev libglib2.0-dev libgmp3-dev libhidapi-dev \
    libmpc-dev libncurses5-dev libpixman-1-dev libslirp-dev libssl-dev \
    libtool libusb-1.0-0-dev make mtools netcat ninja-build \
    python3-cryptography python3-pip python3-pyelftools python3-serial \
    python3-tomli python-is-python3 rsync swig unzip uuid-dev wget \
    xdg-utils xsltproc xterm xz-utils zlib1g-dev
See also the official prerequisites.
- Install the Android
repotool.repois a Python wrapper from Google to manage multiple Git repositories at once. We need it for building OP-TEE:
1
2
sudo curl https://storage.googleapis.com/git-repo-downloads/repo -o /usr/local/bin/repo
sudo chmod a+x /usr/local/bin/repo
- Get OP-TEE for STM32MP1. Check the manifest XML corresponding to the board. Ours is
stm32mp1.xml:
1
2
3
mkdir -p optee-stm32mp1 && cd optee-stm32mp1
repo init -u https://github.com/OP-TEE/manifest.git -m stm32mp1.xml
repo sync
- Build the toolchains:
1
2
cd optee-stm32mp1/build
make -j2 toolchains
- Build the solution. This compiles OP-TEE OS, the Linux kernel, Trusted Firmware-A, U-Boot, xtest, the root filesystem, and related components into a bootable stack.
From the OP-TEE website, the
PLATFORMoption forSTM32MP1-57D-DK1should bestm32mp1-157A_DK1. In practice, the OP-TEE driver was not configured correctly with that value and OP-TEE did not work after boot.PLATFORM=stm32mp1-157C_DK2_SCMI(orstm32mp1-157C_DK2) booted correctly and ran OP-TEE tests. It works, but you may hit issues later because the 157C-DK2 board configuration is not necessarily the same as the 157D-DK1. I opened an issue on the OP-TEE GitHub repo and hope this gets a cleaner fix.
1
2
3
# make PLATFORM=stm32mp1-157A_DK1 all
make PLATFORM=stm32mp1-157C_DK2 all
# or multi-threaded: make -j`nproc` PLATFORM=stm32mp1-157C_DK2 all
This step takes some time. If you encounter build issues, pipe the build to a log file and check for errors. In that case, avoid the -j flag so the log is readable.
When the build completes, it generates sdcard.img in ../out/bin/ relative to the build root. The image is a GPT multi-partition image you can copy to the target SD card.
- Copy the image to an SD card. Insert the SD card into your work PC, find its path with
lsblk, then:
1
2
sudo dd if=../out/bin/sdcard.img of=/dev/sdX conv=fdatasync status=progress
sudo sgdisk -e /dev/sdX
sgdisk -e /dev/sdX converts the partition table from MBR to GPT while attempting to preserve existing partition data. Once the copy is complete, insert the SD card into the board.
- Access the serial console and boot the board. On the STM32MP157D-DK1, the serial console is mapped to UART4 by default. UART4 is connected to the ST-LINK debugger chip, which handles serial-to-USB translation. Connect a USB micro cable from your PC to the
ST-LINK CN11port and run:
1
dmesg | tail
You should see something like:
1
2
usb 1-2: Product: STM32 STLink
cdc_acm 1-2:1.1: ttyACM0: USB ACM device
ttyACM0 means the ST-LINK is at /dev/ttyACM0. Access the serial console with:
1
2
3
4
5
sudo apt install -y picocom
sudo usermod -a -G dialout $USER

# Enter the following in a new terminal
picocom -b 115200 /dev/ttyACM0
After that last command, power the board. You should see the boot process and a login prompt:
1
2
OP-TEE embedded distrib for stm32mp1-157C_DK2
buildroot login:
This means you have successfully booted Linux. Enter root and press Enter. If you cd /, you can see the minimal Linux userland. Now we can test OP-TEE.
Testing OP-TEE
In Buildroot, OP-TEE consists of: TEE supplicant running in the normal world, libteec.so (client library), and xtest (test TAs). Confirm these are present:
1
2
which tee-supplicant  # my result: /usr/sbin/tee-supplicant
which xtest           # my result: /usr/bin/xtest
Some tutorials tell you to run
tee-supplicant &at this step. In our case the daemon is already loaded at boot (check withps -elf), so re-running it may error.
Run OP-TEE xtest, a TEE sanity-test suite:
1
xtest
A successful xtest run means you are ready to build your own OP-TEE trusted applications.
Building a first custom TA is still on my list. In the meantime, see How to develop an OP-TEE Trusted Application.
Troubleshooting
- I opened a GitHub issue here on problems I hit while testing OP-TEE on this board.
- STM32 MPU OP-TEE configuration switches
- STM32 MPU How to build OP-TEE components
Other platforms with good TrustZone and OP-TEE support
More TrustZone documentation and publications
- Demystifying Arm TrustZone: A Comprehensive Survey
- TrustZone Explained: Architectural Features and Use Cases
- Arm TrustZone and OP-TEE
- OP-TEE on Nvidia Jetson
- STM32 MPU OP-TEE concepts overview
- STM32MP157D-DK1 databrief
- STM32MP157x-DKx hardware description
Though OP-TEE was initially created for Arm TrustZone, it has been structured to be compatible with other isolation technologies. ↩︎