RISC-V PMP for dummies
This is part of the TEEs for dummies series. RISC-V Physical Memory Protection (PMP) is not a full “enclave TEE” in the SGX/TDX sense, but it is the hardware primitive many RISC-V TEEs are built on.
In simple terms, PMP is an ISA feature in RISC-V processors that lets you divide system physical memory into contiguous regions with specific access permissions (RWX). It is configured by the most privileged software (firmware) to create and enforce rules that prevent less privileged software (the OS or applications) from reading, writing, or executing code in specific memory regions.
Technical stuff on PMP
RISC-V defines execution modes or privilege levels:
- Machine mode (
M-mode) is the highest privilege level and houses the firmware. M-mode has access to all memory regions and can change machine registers. - Supervisor mode (
S-mode) has lower privileges than M-mode and houses the OS. - Applications execute in user mode (
U-mode).
PMP can isolate a user application so that its memory is inaccessible to the OS or other applications. M-mode configures the PMP registers and enforces the permissions.
To protect a region of physical memory, you define the start/end address and the permissions that apply. RISC-V provides two kinds of control and status registers (CSRs) for PMP: pmpaddr for encoding the memory address (usually the end address) of a PMP region, and pmpcfg for encoding the permission. Together they define a PMP entry. Implementations can have up to 64 PMP entries.
My PMP testing on these RISC-V boards is still ongoing. It is a bit tricky. This post gets you onto the hardware; configuring OpenSBI/PMP itself is the next layer.
Hardware setup
We will focus on two RISC-V boards:
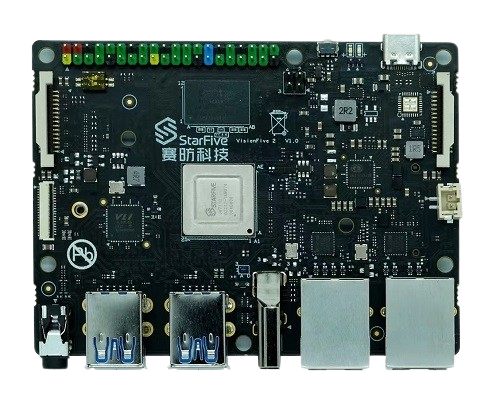
- VisionFive 2: a RISC-V computer from StarFive with an integrated 3D GPU, capable of running a full Linux OS. It is very similar to a Raspberry Pi.
- ESP32-C3: a low-cost (~20 USD) SoC with Wi-Fi, Bluetooth, and peripherals (I2S, I2C, UART, GPIO). It is low power and not meant to run a full Linux OS, but the documentation is good for testing features like PMP.
VisionFive 2
The VisionFive 2 is powered by the StarFive JH7110 SoC:
- CPU: Quad-core 64-bit RISC-V (SiFive U74, RV64GC) with 2MB L2 cache and a monitor core, up to 1.5GHz
- GPU: Imagination BXE-4-32 MC1 at up to 600MHz (VisionFive 1 has no GPU)
- Memory: 2, 4, or 8 GB LPDDR4 DRAM (mine is 8GB)
- 40-pin GPIO header supporting I2C, I2S, PWM, UART, and others
To actually test PMP, you typically need to modify the OpenSBI firmware so that PMP regions are configured in M-mode before the kernel boots. The program to be protected can then be loaded into that region via a linker script, with the entry point entered in M-mode. That part is still on my TODO list.
Setting up Linux on the VisionFive 2
The following installs Debian on the VisionFive 2, based on the official quick start guide.
- Download the latest Debian image from debian.starfivetech.com (e.g. the
202409/sdfolder). Extract it withbzip2:
1
bzip2 -dk starfive-jh7110-202409-SD-minimal-desktop-wayland.img.bz2
- Install BalenaEtcher, connect a microSD card, and flash the image:
Flash from file→Select target card→Flash!.1 Insert the SD card into the board. - Connect a display (HDMI), keyboard, and mouse, then power on the board.
- Default login:
Username: user,Password: starfive. Configure SSH:
1
2
3
sudo systemctl status ssh
echo 'PermitRootLogin=yes' | sudo tee -a /etc/ssh/sshd_config
sudo systemctl restart sshd
- Connect Ethernet or the provided Wi-Fi dongle, then get the board IP with
hostname -I. - Alternatively, scan from another computer:
1
2
sudo apt install arp-scan
sudo arp-scan --localnet
You should see something like:
1
192.168.1.132   3C:97:0E:12:34:56  StarFive Technology Co., Ltd.
Then SSH in with ssh user@192.168.1.132 or ssh root@192.168.1.132.
ESP32-C3
The ESP32-C3 notes in this series are still a stub. Start from the ESP32-C3 datasheet and the ESP-IDF programming guide.
Other resources
- Keystone: An Open Framework for Architecting TEEs
- DORAMI: Privilege Separating Security Monitor on RISC-V TEEs
- Adding Physical Memory Protection to the VeeR EL2 RISC-V Core
- YouTube video explaining PMP
- RISC-V ISA specifications
- Configuring PMP
- Official VisionFive 2 documentation
- VisionFive 2 datasheet
The VisionFive SoC provides a two-switch RGPIO header which determines which storage device is used to load the OS image. See the RGPIO configuration in the quick start guide (page 39). SD card boot is
SDIO 3.0 mode:RGPIO_1 = L(0)andRGPIO_0 = H(1). ↩︎